Hosting a WCF service from within a console application (or within a GUI desktop application, for that matter) is not an ideal choice for a production-level server, given that the host must remain running visibly in the background to service clients. Even if you were to minimize the hosting application to the Windows taskbar, it would still be far too easy to accidentally shut down the host, thereby terminating the connection with any client applications.
Note While it is true that a desktop Windows application does not have to show a main window, a typical *.exe does require user interaction to load the executable. However, you can configure a Windows service (described next) to run even if no users are currently logged on to the workstation.
If you build an in-house WCF application, another alternative you have is to host your WCF service library from within a dedicated Windows service. One benefit of doing so is that you can configure a Windows service to start automatically when the target machine boots up. Another benefit is that Windows services run invisibly in the background (unlike your console application) and do not require user interactivity.
Next, you will learn how to build such a host. Begin by creating a new Windows service project named MathWindowsServiceHost (see Figure 25-12). Once you do this, rename your initial Service1.cs file to MathWinService.cs using Solution Explorer.
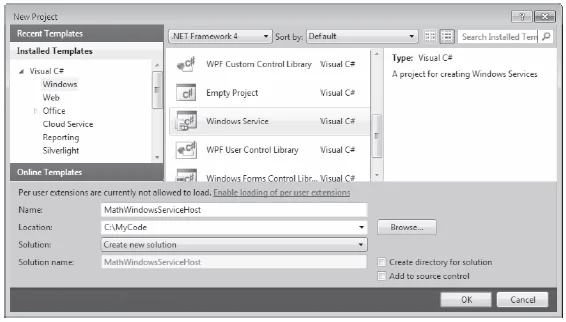
Figure 25-12 Creating a Windows service to host your WCF service
Now assume you have set a reference to your MathServiceLibrary.dll and System.ServiceModel.dll assemblies. All you need to do is use the ServiceHost type in the OnStart() and OnStop() methods of your Windows service type. Open the code file for your service host class (by right-clicking the designer and selecting View Code) and add the following logic:
// Be sure to import these namespaces:
using MathServiceLibrary;
using System.ServiceModel;

namespace MathWindowsServuceHost
{
    public partial class MathWinService: ServiceBase
    {
        // A member variable of type ServiceHost.
        private ServiceHost myHost;
        public MathWinService()
        {
            InitializeComponent();
        }

        protected override void OnStart(string[] args)
        {
            // Just to be really safe.
            if (myHost != null)
            {
                myHost.Close();
                myHost = null;
            }

            // Create the host.
            myHost = new ServiceHost(typeof(MathService));

            // The ABCs in code!
            Uri address = new Uri("http://localhost:8080/MathServiceLibrary");
            WSHttpBinding binding = new WSHttpBinding();
            Type contract = typeof(IBasicMath);

            // Add this endpoint.
            myHost.AddServiceEndpoint(contract, binding, address);

            // Open the host.
            myHost.Open();
        }

        protected override void OnStop()
        {
            // Shut down the host.
            if(myHost != null)
                myHost.Close();
        }
    }
}
While nothing prevents you from using a configuration file when building a Windows service host for a WCF service, here (for a change of pace) you establish the endpoint programmatically using the Uri, WSHttpBinding, and Type classes, rather than by using a *.config file. Once you create each aspect of the ABCs, you inform the host programmatically by calling AddServiceEndpoint().
If you wish to inform the runtime that you want to gain access to each of the default endpoint bindings stored in the .NET 4.0 machine.config file, you can simplify your programming logic by specifying base addresses when you invoke the constructor of ServiceHost. In this case, you do not need to specify the ABCs manually in code or call AddServiceEndpoint(); instead, you call AddDefaultEndpoints(). Consider the following update:
protected override void OnStart(string[] args)
{
    if (myHost != null)
    {
        myHost.Close();
    }

    // Create the host and specify a URL for an HTTP binding.
    myHost = new ServiceHost(typeof(MathService),
        new Uri("http://localhost:8080/MathServiceLibrary"));

    // Opt in for the default endpoints!
    myHost.AddDefaultEndpoints();

    // Open the host.
    myHost.Open();
}
While you could enable MEX programmatically as well, here you will opt for a WCF 4.0 configuration file. Insert a new App.config file into your Windows service project that contains the following default MEX settings:
<configuration>
    <system.serviceModel>
        <services>
            <service name="MathServiceLibrary.MathService">
            </service>
        </services>

        <behaviors>
            <serviceBehaviors>
                <behavior>
                    <serviceMetadata httpGetEnabled="true"/>
                </behavior>
            </serviceBehaviors>
        </behaviors>

    </system.serviceModel>
</configuration>
To register your Windows service with the operating system, you need to add an installer to your project that contains the necessary code to allow you to register the service. To do so, right-click the Windows service designer surface and select Add Installer (see Figure 25-13).
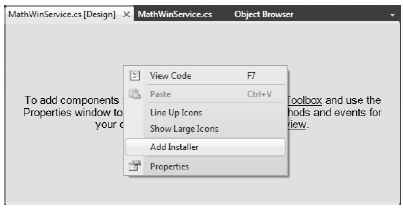
Figure 25-13 Adding an installer for the Windows service
Once you do this, you can see two components have been added to a new designer surface representing the installer. The first component (named serviceProcessInstaller1 by default) represents an item that can install a new Windows service on the target machine. Select this item on the designer and use the Properties window to set the Account property to LocalSystem (see Figure 25-14).

Figure 25-14 Be sure to run the Windows service as a local system account
The second component (named serviceInstaller1) represents a type that will install your particular Windows service. Again, use the Properties window to change the ServiceName property to MathService (as you might have guessed, this represents the friendly display name of the registered Windows service), set the StartType property to Automatic, and add a friendly description of your Windows service using the Description property (see Figure 25-15).
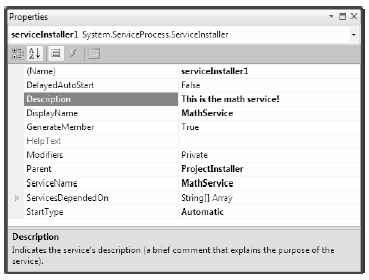
Figure 25-15 Configuring installer details
At this point, you can compile your application.
A Windows service can be installed on the host machine using a traditional setup program (such as an *.msi installer) or via the installutil.exe command-line tool. Using a Visual Studio 2010 command prompt, change into the \bin\Debug folder of your MathWindowsServiceHost project. Now, enter the following command:
installutil MathWindowsServiceHost.exe
Assuming the installation succeeded, you can now open the Services applet located under the Administrative Tools folder of your Control Panel. You should see the friendly name of your Windows service listed alphabetically. Once you locate it, make sure you start the service on your local machine using the Start link (see Figure 25-16).
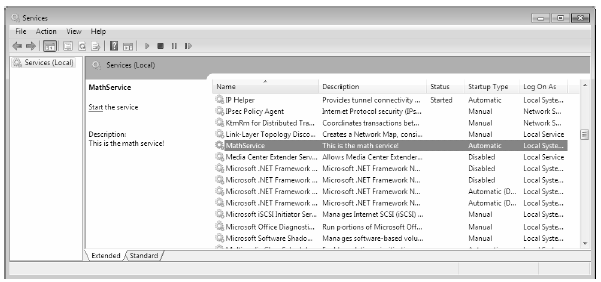
Figure 25-16 Viewing your Windows service, which hosts your WCF service
Now that the service is alive and kicking, the last step is to build a client application to consume its services.